Configure pre-check-in items, forms, and auto-guidance
How to use the Pre-check-in settings screen (for partner-store admins): toggle check-in items on/off, enter the agreement form (rental terms) with multilingual auto-translation, require full scroll, set start/finish guidance messages, and configure chat auto-guidance (auto-send).
Video #131:02
Pre-check-in (setup and sending)
The audio and subtitles of these videos are in Japanese. An English translation of the narration is available below.
Narration transcript (English translation)
Pre-check-in lets customers complete procedures on their own smartphone before coming to the store. Open “Pre-Check-in Settings” in “Settings”.
In “Check-in Items”, turn on or off what customers fill in, such as a photo of their driver's license or the consent form.
Write the consent form and notes in one language and they're translated automatically. Pre-registering cards requires the Stripe connection.
On the “Pre-Check-in” card in booking details, tap “Send pre-check-in” to create a link just for that customer; “Not sent” changes to “Sent”.
There are three ways to send it: “Send via SMS”, “Show QR”, and “Copy link”. Customers can scan the QR code at the counter.
When the customer finishes, the status becomes “Completed”, and you can check documents and signatures with “View details”. That's how to set up and send pre-check-in.
Voice: ElevenLabs (AI-generated voice)
Contents
- Overview
- Configure check-in items
- STEP 1: Toggle the items you need on/off
- STEP 2: Enter the agreement content
- Set guidance messages and auto-guidance
- STEP 3: Guidance messages and chat auto-guidance
- FAQ
- Q. Which language should I enter the agreement in?
- Q. How do I send the configured pre-check-in to customers?
- Q. Can anyone use this screen?
- Related
Overview
Pre-check-in settings is where you configure the items, agreement form, and guidance that customers fill in before arriving (for partner-store admins). What you set here is reflected in the pre-check-in you send from booking-detail.
| Section | Content |
|---|---|
| Check-in items | On/off for driver info, license/documents, rental terms, etc. |
| Agreement content | Title, body, require full scroll |
| Guidance messages | Messages shown at start/finish (optional) |
| Chat auto-guidance | Auto-send guidance and a link when a chat opens |
Configure check-in items
STEP 1: Toggle the items you need on/off
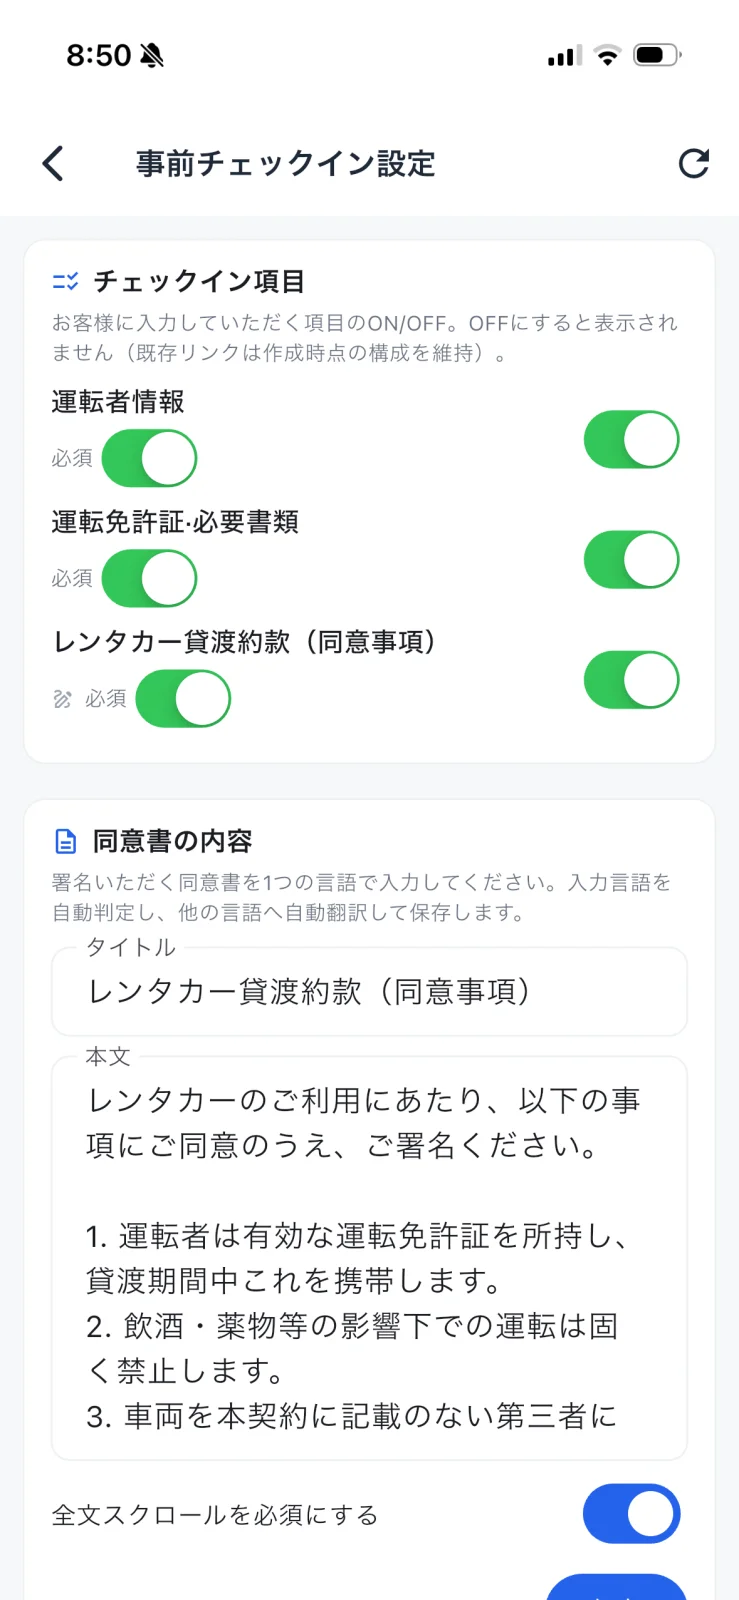
In Check-in items, toggle on/off the items customers fill in (e.g. driver info, driver's license & required documents, rental terms (agreement)). Required items must be filled in before the customer can finish.
STEP 2: Enter the agreement content
In Agreement content, enter a title and body. Enter the form to be signed in one language, and it's auto-translated and saved in the others. Turn on "Require full scroll" to make customers read the body to the end before agreeing.
Set guidance messages and auto-guidance
STEP 3: Guidance messages and chat auto-guidance
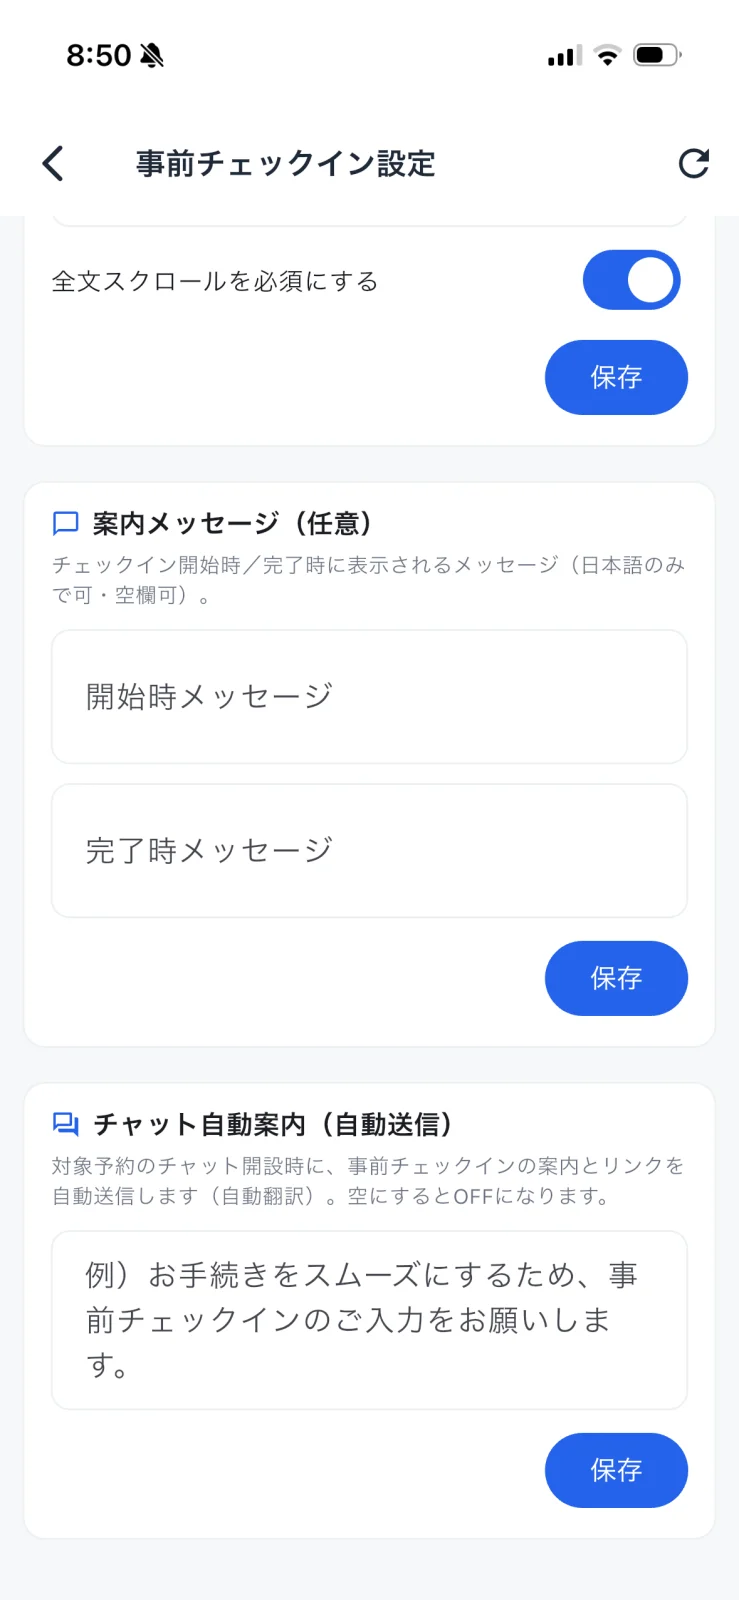
Scroll down to set, under Guidance messages (optional), the message shown at the start / finish of check-in (Japanese only; may be left blank). If you enter text in Chat auto-guidance (auto-send), the pre-check-in guidance and link are sent automatically when a chat opens for the relevant booking.
FAQ
Q. Which language should I enter the agreement in?
A. Enter it in one language and it's auto-translated and saved in the others. Customers see it in their own language.
Q. How do I send the configured pre-check-in to customers?
A. From "Pre-check-in" in booking-detail, send it by SMS, QR, or link. With chat auto-guidance set, it's sent automatically when a chat opens.
Q. Can anyone use this screen?
A. Pre-check-in settings is a feature for partner-store admins.
Related
- booking-detail — Send pre-check-in
- chat — Send guidance via Translation Chat
- settings — Reach other management items from Settings